window._wpemojiSettings = {"baseUrl":"https:\/\/s.w.org\/images\/core\/emoji\/15.0.3\/72x72\/","ext":".png","svgUrl":"https:\/\/s.w.org\/images\/core\/emoji\/15.0.3\/svg\/","svgExt":".svg","source":{"concatemoji":"https:\/\/www.uniquenewsonline.com\/wp-includes\/js\/wp-emoji-release.min.js?ver=6.5.2"}};
/*! This file is auto-generated */
!function(i,n){var o,s,e;function c(e){try{var t={supportTests:e,timestamp:(new Date).valueOf()};sessionStorage.setItem(o,JSON.stringify(t))}catch(e){}}function p(e,t,n){e.clearRect(0,0,e.canvas.width,e.canvas.height),e.fillText(t,0,0);var t=new Uint32Array(e.getImageData(0,0,e.canvas.width,e.canvas.height).data),r=(e.clearRect(0,0,e.canvas.width,e.canvas.height),e.fillText(n,0,0),new Uint32Array(e.getImageData(0,0,e.canvas.width,e.canvas.height).data));return t.every(function(e,t){return e===r[t]})}function u(e,t,n){switch(t){case"flag":return n(e,"\ud83c\udff3\ufe0f\u200d\u26a7\ufe0f","\ud83c\udff3\ufe0f\u200b\u26a7\ufe0f")?!1:!n(e,"\ud83c\uddfa\ud83c\uddf3","\ud83c\uddfa\u200b\ud83c\uddf3")&&!n(e,"\ud83c\udff4\udb40\udc67\udb40\udc62\udb40\udc65\udb40\udc6e\udb40\udc67\udb40\udc7f","\ud83c\udff4\u200b\udb40\udc67\u200b\udb40\udc62\u200b\udb40\udc65\u200b\udb40\udc6e\u200b\udb40\udc67\u200b\udb40\udc7f");case"emoji":return!n(e,"\ud83d\udc26\u200d\u2b1b","\ud83d\udc26\u200b\u2b1b")}return!1}function f(e,t,n){var r="undefined"!=typeof WorkerGlobalScope&&self instanceof WorkerGlobalScope?new OffscreenCanvas(300,150):i.createElement("canvas"),a=r.getContext("2d",{willReadFrequently:!0}),o=(a.textBaseline="top",a.font="600 32px Arial",{});return e.forEach(function(e){o[e]=t(a,e,n)}),o}function t(e){var t=i.createElement("script");t.src=e,t.defer=!0,i.head.appendChild(t)}"undefined"!=typeof Promise&&(o="wpEmojiSettingsSupports",s=["flag","emoji"],n.supports={everything:!0,everythingExceptFlag:!0},e=new Promise(function(e){i.addEventListener("DOMContentLoaded",e,{once:!0})}),new Promise(function(t){var n=function(){try{var e=JSON.parse(sessionStorage.getItem(o));if("object"==typeof e&&"number"==typeof e.timestamp&&(new Date).valueOf()<e.timestamp+604800&&"object"==typeof e.supportTests)return e.supportTests}catch(e){}return null}();if(!n){if("undefined"!=typeof Worker&&"undefined"!=typeof OffscreenCanvas&&"undefined"!=typeof URL&&URL.createObjectURL&&"undefined"!=typeof Blob)try{var e="postMessage("+f.toString()+"("+[JSON.stringify(s),u.toString(),p.toString()].join(",")+"));",r=new Blob([e],{type:"text/javascript"}),a=new Worker(URL.createObjectURL(r),{name:"wpTestEmojiSupports"});return void(a.onmessage=function(e){c(n=e.data),a.terminate(),t(n)})}catch(e){}c(n=f(s,u,p))}t(n)}).then(function(e){for(var t in e)n.supports[t]=e[t],n.supports.everything=n.supports.everything&&n.supports[t],"flag"!==t&&(n.supports.everythingExceptFlag=n.supports.everythingExceptFlag&&n.supports[t]);n.supports.everythingExceptFlag=n.supports.everythingExceptFlag&&!n.supports.flag,n.DOMReady=!1,n.readyCallback=function(){n.DOMReady=!0}}).then(function(){return e}).then(function(){var e;n.supports.everything||(n.readyCallback(),(e=n.source||{}).concatemoji?t(e.concatemoji):e.wpemoji&&e.twemoji&&(t(e.twemoji),t(e.wpemoji)))}))}((window,document),window._wpemojiSettings);
https://www.uniquenewsonline.com/wp-includes/js/jquery/jquery.min.js
https://www.uniquenewsonline.com/wp-includes/js/jquery/jquery-migrate.min.js
var pbLocalizeObj = {"ajax":"https:\/\/www.uniquenewsonline.com\/wp-admin\/admin-ajax.php","seconds":"seconds","thisWillClose":"This will close in","icons":{"close_icon":"<svg class=\"ays_pb_material_close_icon\" xmlns=\"https:\/\/www.w3.org\/2000\/svg\" height=\"36px\" viewBox=\"0 0 24 24\" width=\"36px\" fill=\"#000000\" alt=\"Pop-up Close\"><path d=\"M0 0h24v24H0z\" fill=\"none\"\/><path d=\"M19 6.41L17.59 5 12 10.59 6.41 5 5 6.41 10.59 12 5 17.59 6.41 19 12 13.41 17.59 19 19 17.59 13.41 12z\"\/><\/svg>","close_circle_icon":"<svg class=\"ays_pb_material_close_circle_icon\" xmlns=\"https:\/\/www.w3.org\/2000\/svg\" height=\"24\" viewBox=\"0 0 24 24\" width=\"36\" alt=\"Pop-up Close\"><path d=\"M0 0h24v24H0z\" fill=\"none\"\/><path d=\"M12 2C6.47 2 2 6.47 2 12s4.47 10 10 10 10-4.47 10-10S17.53 2 12 2zm5 13.59L15.59 17 12 13.41 8.41 17 7 15.59 10.59 12 7 8.41 8.41 7 12 10.59 15.59 7 17 8.41 13.41 12 17 15.59z\"\/><\/svg>","volume_up_icon":"<svg class=\"ays_pb_fa_volume\" xmlns=\"https:\/\/www.w3.org\/2000\/svg\" height=\"24\" viewBox=\"0 0 24 24\" width=\"36\"><path d=\"M0 0h24v24H0z\" fill=\"none\"\/><path d=\"M3 9v6h4l5 5V4L7 9H3zm13.5 3c0-1.77-1.02-3.29-2.5-4.03v8.05c1.48-.73 2.5-2.25 2.5-4.02zM14 3.23v2.06c2.89.86 5 3.54 5 6.71s-2.11 5.85-5 6.71v2.06c4.01-.91 7-4.49 7-8.77s-2.99-7.86-7-8.77z\"\/><\/svg>","volume_mute_icon":"<svg xmlns=\"https:\/\/www.w3.org\/2000\/svg\" height=\"24\" viewBox=\"0 0 24 24\" width=\"24\"><path d=\"M0 0h24v24H0z\" fill=\"none\"\/><path d=\"M7 9v6h4l5 5V4l-5 5H7z\"\/><\/svg>"}};
https://www.uniquenewsonline.com/wp-content/plugins/ays-popup-box/public/js/ays-pb-public.js
var breeze_prefetch = {"local_url":"https:\/\/www.uniquenewsonline.com","ignore_remote_prefetch":"1","ignore_list":["\/wp-admin\/"]};
https://www.uniquenewsonline.com/wp-content/plugins/breeze/assets/js/js-front-end/breeze-prefetch-links.min.js
Unique News Online
How to make professional cakes at home?
How to make professional cakes at home? Published
3 years ago on
August 27, 2021 Cakes are amongst one of the most tempting and delicious inventions of mankind. Well, who doesn’t love to enjoy devouring a chef’s special delightful cake in the cosy ambience of a five-star restaurant?
However, the current pandemic situation has made this small wish turn into a nightmare. Gone are the days when we could carefreely sit in a cafe or restaurant and order our favourite cakes. Nowadays, it is hard to even recall the last time we went to a restaurant for dine-in.
Times have been challenging, and all of us certainly miss enjoying restaurant-style expert cakes. But what if we tell you that you can have that same chef’s special tasty cake at the comfort of your home? Sounds unbelievable, no? But, no worries, this isn’t a trap.
We all miss enjoying our favourite professionally curated cakes baked with utter perfection. Thus, we decided to come up with some tricks and tips that can help you imitate the exact professional cake in the setting of your kitchen at home.
So, do not forget to read this blog till the end and make notes!
Follow The Recipe Word By Word Although this might seem ridiculous to you, this is the very reason that often turns cakes into disasters. Often, not following the recipe bit by bit leads to hard cakes that leave you wondering what went wrong.
Thus, it is vital to thoroughly read the recipe first and understand every step that follows. Secondly, always prep and assemble all the ingredients before you start doing the actual drill. This will ensure that you don’t miss out on any of the essential elements.
To conclude, it is essential to follow a recipe that comes from a credible source or is approved by a chef. Sometimes there are, by default, wrong recipes floating on the Internet. So, be careful regarding which recipe to follow.
Ensuring The Right Temperature Temperature plays an integral role when it comes to baking. Thus, it is vital to ensure correct temperatures for each step, be it melting or baking. Also, never forget to preheat your oven as per the already mentioned temperature.
Sometimes recipes require certain ingredients to be at room temperature. This can be a little challenging to tackle. As the kitchen temperature is usually higher than the room temperature once the cooking starts.
Be very careful with temperatures when baking a cake . Hence, leave such ingredients out in the kitchen before you start any heated-up action in the kitchen. Improper temperatures lead to underbaked or overbaked cakes. The correct temperature is the key to making a cake with professional texture and sponginess.
Use The Correct Measurements Baking is a cooking process that requires extreme precision and detail. Hence, it is vital to measure all your ingredients correctly before starting the process. This saves you from last-minute hassles and mess.
Measurements are critical in baking to ensure the cake has the right taste balance and rises just as much as it should. You should definitely get your hands on measuring cups and spoons before getting into baking a cake.
A professional cake can only be made with correct measurements. So, again don’t read the recipe hastily. Follow all the measurements correctly. You can measure the ingredients beforehand so that the baking process itself doesn’t take much time.
Getting The Frosting Right Preparing the frosting and decorating the cake is amongst the trickiest parts of baking. People often complain that their frosting was not of the right consistency, making the cake look like a melting chocolate ball. It is challenging to get the frosting right.
This is because some precautions must be taken care of when preparing the frosting. Firstly, it is crucial to prep your utensils and ingredients before you beat your frosting.
You need to keep your mixing bowl and beater both in the refrigerator so that they are of the same temperature as your cream and other ingredients. Secondly, do get yourself turntable cake decorating equipment. It makes the decoration process easy and gives professional results.
Mix It The Right Way Mixing and blending all the ingredients together is the key to achieve a smooth cake batter. It is essential to follow the proper technique when mixing different batters, be it the dry mix, liquid batter, or heavy frosting. The method is not very difficult to grasp.
However, it is a bit technical and does require a bit of practice to crack. You can search the tutorials on the Internet to learn the cut and fold mixing technique. It is often used in many cake recipes.
Other than that, it is vital to have in store the right electric beater and spatulas. This will ensure that the mixing, folding, and beating process is smoothly carried out. A well-mixed batter leads to a smoothly baked cake that radiates perfection and professionalism.
Final Thoughts We all miss the times we used to enjoy and devour professionally baked tasty cakes. People are often left in anguish when they receive stale cakes in-home deliveries. Well, you can still order for home delivery. However, nothing can beat eating a freshly baked cake.
Furthermore, lockdowns and quarantines haven’t left us with many choices anyway. In such times, trying to bake a professional cake can be a fun activity. You can also get the entire family together to achieve this fun-filled task.
Plus, who knows, you might actually end up discovering your hidden baking talents. Don’t ever underestimate your abilities and skills. The baking itself is a therapeutical experience; hence, you must try it out at least once if you haven’t already.
The perks of trying to bake a professional cake at home can also not be ignored. Suppose everything goes well and you actually learn how to make professional cakes! Congratulations, in that case, you have a side hustle idea ready for you to explore. Please let us know if we missed out on some tips to help you make professional cakes at home. We’d be awaiting your lovely feedback in the comments section below. Until then, happy baking!
Greetings, I’m Audrey. I’m a Blogger living in Birmingham, United Kingdom. I am a fan of music, technology, and entrepreneurship. I’m also interested in fitness and yoga.
Easy Ragi Poha Recipe for a Healthy Start Published
3 months ago on
February 9, 2024 Ragi Poha is one of the most popular breakfast and evening snack options in India. It is loaded with protein and healthy fats which help in retaining muscle mass by slowing down the ageing process. The popularity of finger millets has grown tremendously in the last few years being 2023 claimed as the “International Year of Millets.”
Therefore, people are slowly switching from wheat and rice to finger millet for its exceptional health benefits. Here is one easy and quick high-protein Ragi Poha recipe to start your day with or fulfill your cravings with. Cook and serve warm!
Recipe By c4cooking Course: Breakfast, Snacks Cusine:Indian Difficulty:Easy
INGREDIENTS 2 Cups Ragi Poha (Ragi Flakes)
2 TBSP Ghee
2 TBSP (chopped) cashew nut
1/2 Cup (grated) coconut
A pinch of Cardamom powder
2 TBSP raw sugar or jaggery
DIRECTION For preparing healthy ragi poha, first of all, heat a frying pan. Keep the flame in medium.
Then add Ghee, and let it melt.
Then add chopped cashews, and fry until they turn golden brown.
Then add ragi poha or ragi flakes.
Fry the poha for two minutes on low heat.
Then add grated coconut, and fry for one more minute.
Add cardamom powder and raw sugar or jaggery as per your preference.
Mix everything for two more minutes and then turn off the heat.
Serve a healthy and tasty Ragi Poha recipe when warm.
NOTES Ragi Poha can be customised by adding peanuts, and raisins to make it more tasty.
If using jaggery, then jaggery powder is recommended.
Keep the flame low to medium to avoid poha getting burned.
Also Read: Delightful Dal Appe: A Recipe for Flavorful Indian Dumplings
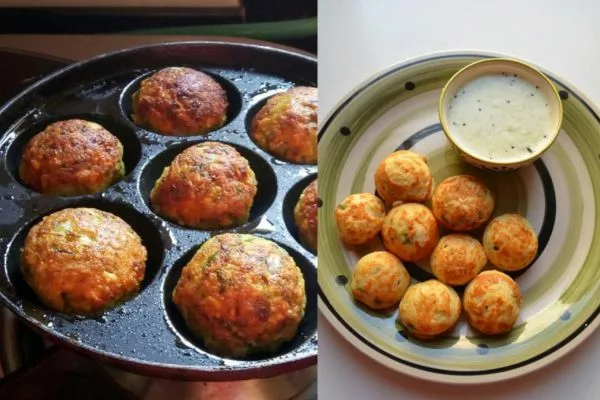
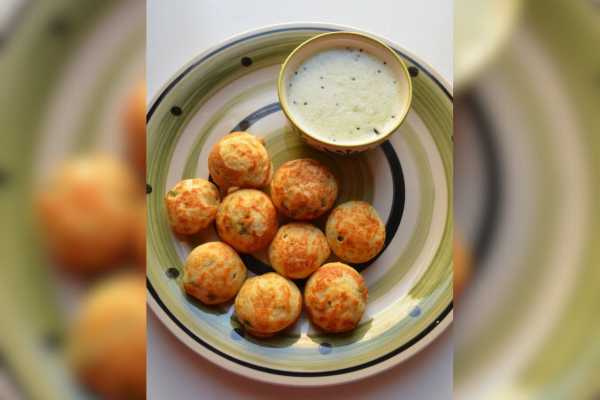
Delightful Dal Appe: A Recipe for Flavorful Indian Dumplings Published
3 months ago on
February 7, 2024 Every morning people think about what to have for breakfast. In that context, Dal Appe fits in. It is a mouthwatering breakfast option that is high in protein as it is made with a blend of different dal or pulses.
As this dish is prepared from a natural fermentation process, it becomes a great option for the body which promotes good gut bacteria. Here we have mentioned the most simple and easy Dal Appe breakfast recipe. Try and enjoy!
Also Read: Indian Aloo Chana Chaat Recipe: STEP-BY-STEP Guide
STEP-BY-STEP Guide to Dal Appe Recipe Recipe By Sakshu Recipes Course: Breakfast Option Cusine:Indian Difficulty:Easy
INGREDIENTS 1 cup rice
1½ cup chana dal
1/3 cup moong dal
1¼ cup urad dal
3 to 4 garlic cloves
1 tsp fruit salt
1½ tsp mustard seeds
1½ inch ginger
2 green chilies
1½ tsp cumin seeds
1½ tsp til
Finely chopped coriander leaves
4 to 5 curry leaves
Water
Salt as per taste
Oil
DIRECTION Preparing the Batter Wash the rice, chana dal, moong dal, and urad dal thoroughly. Soak everything together for four to five hours minimum.<br>Grind the pulses with rice together and make a smooth paste out of it.<br>Let the batter rest for 5-6 hours to ferment properly. Give it a good mix.
Adding Tadka to Batter In a pan heat some oil, add mustard seeds, and curry leaves. Add the tadka mix to the batter.<br>Then add coriander leaves, then take garlic cloves, green chilies, ginger, and roasted cumin seeds. Give the ingredients a good smash together and add them to the batter.<br>Then add the remaining ajwain, salt as per taste, and fruit salt, to the batter and give it a mix.
Preparing Dal Appe Take an "Appe patra" a utensil in which Appes are made. Heat it, add oil to the base, and put the batter on the tray.<br>Keep the flame medium and cook it for five minutes. Then after 5 minutes, flip the apple and again cook for 5 more minutes keeping the flame medium.<br>The tasty appe is ready, enjoy it with sauce or chutney.
NOTES Keep the flame medium, neither low nor high.
The batter can be customised by adding fried onions, peanut paste to make it nutrition dense and tastier.
Adding Fruit Salt is optional.
Indian Aloo Chana Chaat Recipe: STEP-BY-STEP Guide Published
3 months ago on
January 31, 2024 Aloo Chana chat is a street food that has originated from India, especially in the West Bengal and Northern Indian states. It is prepared by boiling Potatoes and mixing the same with other ingredients to make it more fulfilling and healthy. Adding oil, spices, and chutney to this recipe makes its taste beyond words! Do try this healthy Aloo Chana Chaat recipe which is high in protein and can be consumed as morning breakfast or evening snack.
Recipe By Vahchef Course: Street Food, Snacks Cusine:Indian Difficulty:Easy
INGREDIENTS 1 Bunch chopped Coriander
2 chopped Green chilies
1/2 Bunch chopped Mint
1 tsp Chat Masala
1 tbsp Red chilly powder
1/2 Cup Chickpeas (chana dal)
2 boiled potatoes
1 tsp lime juice
Salt To Taste
1 Chopped Onion
3 tbsp Pomegranate seeds
1 tsp Cumin powder
2 tbsp Sweet tamarind chutney
DIRECTION Preparation for the chat Take the boiled potatoes and cut them into cubical pieces. Dry roast some cumin seeds, crush them, and keep them aside.
Preparing the Chaat Take a big bowl and add cut potatoes, and boiled chicken peas, and mix them with the help of a spoon.<br>Then add chopped mint, coriander, green chili, and Onions and mix them.<br>Then add, chat masala powder, red chilly powder, lime juice, and salt to taste and mix everything.<br>To the bowl, add sweet tamarind chutney, freshly roasted crushed cumin seeds, and pomegranate seeds, and mix all the ingredients. The most delicious Aloo Chana Chaat is ready!
NOTES Chaat can be customised by adding chopped Tomatoes, roasted peanuts and sprout, to make it more healthy.
Add salt with caution as chaat masala also contains salt.
Sweet tamarind chutney is optional, but it gives an enhanced taste to the chaat.
Also Read:
STEP-BY-STEP Bolinas Recipe Guide
Mastering Satyanarayan Sheera Recipe: STEP-BY-STEP Guide
(adsbygoogle = window.adsbygoogle || []).push({});
(adsbygoogle = window.adsbygoogle || []).push({});
(adsbygoogle = window.adsbygoogle || []).push({});
(adsbygoogle = window.adsbygoogle || []).push({});
(adsbygoogle = window.adsbygoogle || []).push({});
(adsbygoogle = window.adsbygoogle || []).push({});
(adsbygoogle = window.adsbygoogle || []).push({});
(adsbygoogle = window.adsbygoogle || []).push({});
(adsbygoogle = window.adsbygoogle || []).push({});
(adsbygoogle = window.adsbygoogle || []).push({});
(adsbygoogle = window.adsbygoogle || []).push({});
(adsbygoogle = window.adsbygoogle || []).push({});
(adsbygoogle = window.adsbygoogle || []).push({});
(adsbygoogle = window.adsbygoogle || []).push({});
(adsbygoogle = window.adsbygoogle || []).push({});
(adsbygoogle = window.adsbygoogle || []).push({});
(adsbygoogle = window.adsbygoogle || []).push({});
(adsbygoogle = window.adsbygoogle || []).push({});
(adsbygoogle = window.adsbygoogle || []).push({});
(adsbygoogle = window.adsbygoogle || []).push({});
(adsbygoogle = window.adsbygoogle || []).push({});
(adsbygoogle = window.adsbygoogle || []).push({});
if (window.innerWidth < 768) { jQuery(document).find('.ays-pb-modal_2').css({'top': '0', 'right': '0', 'bottom': '0', 'left': '0'}); } else { jQuery(document).find('.ays-pb-modal_2').css({'top': '0', 'right': '0', 'bottom': '0', 'left': '0'}); }
(function( $ ) {
'use strict';
$(document).ready(function(){
let pbViewsFlag_2 = true;
if ('image_type_img_theme' == 'notification') {
$(document).find('.ays-pb-modals').prependTo($(document.body));
} else {
$(document).find('.ays-pb-modals:not(.ays-pb-modals.ays-pb-notification-modal)').appendTo($(document.body));
}
let isMobile = false;
let closePopupOverlay = 1;
let isPageScrollDisabled = 0;
let checkAnimSpeed = 1;
let ays_pb_animation_close_speed = $(document).find('#ays_pb_animation_close_speed_2').val();
let ays_pb_effectIn_2 = $(document).find('#ays_pb_modal_animate_in_2').val();
let ays_pb_effectOut_2 = $(document).find('#ays_pb_modal_animate_out_2').val();
if (window.innerWidth < 768) {
isMobile = true;
closePopupOverlay = 1;
isPageScrollDisabled = 0;
checkAnimSpeed = 1;
ays_pb_animation_close_speed = $(document).find('#ays_pb_animation_close_speed_mobile_2').val();
ays_pb_effectIn_2 = $(document).find('#ays_pb_modal_animate_in_mobile_2').val();
ays_pb_effectOut_2 = $(document).find('#ays_pb_modal_animate_out_mobile_2').val();
}
let ays_pb_delayOpen_2 = parseInt($(document).find('.ays_pb_delay_2').val());
let ays_pb_scrollTop_2 = parseInt($(document).find('.ays_pb_scroll_2').val());
if (isMobile) {
if (0) {
ays_pb_scrollTop_2= parseInt($(document).find('.ays_pb_scroll_mobile_2').val());
}if (0) {
ays_pb_delayOpen_2 = parseInt($(document).find('.ays_pb_delay_mobile_2').val());
}
}
let time_pb_2 = $(document).find('.ays_pb_timer_2 span').data('seconds'),
ays_pb_animation_close_seconds = (ays_pb_animation_close_speed / 1000);
if( ays_pb_delayOpen_2 == 0 && ays_pb_scrollTop_2 == 0){
$(document).find('.av_pop_modals_2').css('display','block');
}if (window.innerWidth < 768) {
var mobileTimer = +$(document).find('.ays_pb_timer_2 span').attr('data-ays-mobile-seconds');
$(document).find('.ays_pb_timer_2 span').html(mobileTimer);
time_pb_2 = mobileTimer;
}ays_pb_animation_close_speed = parseFloat(ays_pb_animation_close_speed) - 50;$(document).find('.ays_music_sound').css({'display':'none'});
if(time_pb_2 !== undefined){
if(time_pb_2 !== 0){
$(document).find('#ays-pb-modal-checkbox_2').trigger('click');
if(ays_pb_scrollTop_2 == 0){
var ays_pb_flag = true;
$(document).find('.ays-pb-modal_2').css({
'animation-duration': ays_pb_animation_close_seconds + 's'
});
let timer_pb_2 = setInterval(function(){
let newTime_pb_2 = time_pb_2--;
$(document).find('.ays_pb_timer_2 span').text(newTime_pb_2);
if(newTime_pb_2 <= 0){
$(document).find('.ays-pb-modal-close_2').trigger('click');
$(document).find('.ays-pb-modal_2').attr('class', 'ays-pb-modal ays-pb-modal-image-type-img ays-pb-modal_2 ays-pb-border-mobile_2 '+ays_pb_effectOut_2);
if(ays_pb_effectOut_2 != 'none'){
setTimeout(function(){
$(document).find('.ays-pb-modal_2').css('display', 'none');
$(document).find('.ays-pb-modal_2').attr('data-ays-flag','true');
}, ays_pb_animation_close_speed);
}else{
$(document).find('.ays-pb-modal_2').css('display', 'none');
$(document).find('.ays-pb-modal_2').attr('data-ays-flag','true');
}
clearInterval(timer_pb_2);
}
$(document).find('.ays-pb-modal-close_2').one('click', function(){
if (pbViewsFlag_2) {
var pb_id = 2;$.ajax({
url: pbLocalizeObj.ajax,
method: 'POST',
dataType: 'text',
data: {
id: pb_id,
action: 'ays_increment_pb_views',
},
});pbViewsFlag_2 = false;
}
$(document).find('.av_pop_modals_2').css('pointer-events', 'none');
$(document).find('.ays-pb-modal_2').attr('class', 'ays-pb-modal ays-pb-modal-image-type-img ays-pb-modal_2 ays-pb-border-mobile_2 '+ays_pb_effectOut_2);
$(this).parents('.ays-pb-modals').find('iframe').each(function(){
var key = /https:\/\/www.youtube.com/;
var src = $(this).attr('src');
$(this).attr('src', $(this).attr('src'));
});
$(this).parents('.ays-pb-modals').find('video.wp-video-shortcode').each(function(){
if(typeof $(this).get(0) != 'undefined'){
if ( ! $(this).get(0).paused ) {
$(this).get(0).pause();
}
}
});
$(this).parents('.ays-pb-modals').find('audio.wp-audio-shortcode').each(function(){
if(typeof $(this).get(0) != 'undefined'){
if ( ! $(this).get(0).paused ) {
$(this).get(0).pause();
}
}
});
var close_sound_src = $(document).find('#ays_pb_close_sound_2').attr('src');
if(checkAnimSpeed && typeof close_sound_src !== 'undefined' && 'off' === 'on'){
if(checkAnimSpeed !== 0){
var playPromise = $(document).find('#ays_pb_close_sound_2').get(0).play();
if (playPromise !== undefined) {
playPromise.then(function() {
audio.pause();
}).catch(function(error) {
});
}
}
}
if(ays_pb_effectOut_2 != 'none'){
setTimeout(function(){
$(document).find('.ays-pb-modal_2').css('display', 'none');
$(document).find('.av_pop_modals_2').css('display', 'none');
$(document).find('.ays-pb-modal_2').attr('data-ays-flag','true');
if($('#ays_pb_close_sound_2').get(0) != undefined){
if(!$('#ays_pb_close_sound_2').get(0).paused){
$(document).find('.ays-pb-modal_2').css('display', 'none');
var audio = $('#ays_pb_close_sound_2').get(0);
audio.pause();
audio.currentTime = 0;
}
}
}, ays_pb_animation_close_speed);
}else{
$(document).find('.ays-pb-modal_2').css('display', 'none');
$(document).find('.av_pop_modals_2').css('display', 'none');
$(document).find('.ays-pb-modal_2').attr('data-ays-flag','true');
if($('#ays_pb_close_sound_2').get(0) != undefined){
if(!$('#ays_pb_close_sound_2').get(0).paused){
$(document).find('.ays-pb-modal_2').css('display', 'none');
var audio = $('#ays_pb_close_sound_2').get(0);
audio.pause();
audio.currentTime = 0;
}
}
}
$(document).find('#ays-pb-screen-shade_2').css({'opacity': '0', 'display': 'none'});
clearInterval(timer_pb_2);
});
$(document).on('keydown', function(event) {
if('1' && ays_pb_flag){
var escClosingPopups = $(document).find('.ays-pb-close-popup-with-esc:visible');
if (event.keyCode == 27) {
var topmostPopup = escClosingPopups.last();
topmostPopup.find('.ays-pb-modal-close_2').trigger('click');
}
} else {
ays_pb_flag = true;
}
ays_pb_flag = false;
});
},1000);
if(closePopupOverlay && 'On' == 'On'){
$(document).find('.av_pop_modals_2').on('click', function(e) {
var pb_parent = $(this);
var pb_div = $(this).find('.ays-pb-modal_2');
if (!pb_div.is(e.target) && pb_div.has(e.target).length === 0){
$(document).find('.ays-pb-modal-close_2').click();
}
});
}
}
} else {
$(document).find('.ays_pb_timer_2').css('display','none');
$(document).find('.ays-pb-modal_2').css({
'animation-duration': ays_pb_animation_close_seconds + 's'
});
$(document).find('.ays-pb-modal-close_2').one('click', function(){
if (pbViewsFlag_2) {
var pb_id = 2;$.ajax({
url: pbLocalizeObj.ajax,
method: 'POST',
dataType: 'text',
data: {
id: pb_id,
action: 'ays_increment_pb_views',
},
});pbViewsFlag_2 = false;
}
$(document).find('.av_pop_modals_2').css('pointer-events', 'none');
$(document).find('.ays-pb-modal_2').attr('class', 'ays-pb-modal ays-pb-modal-image-type-img ays-pb-modal_2 ays-pb-border-mobile_2 '+ays_pb_effectOut_2);
$(this).parents('.ays-pb-modals').find('iframe').each(function(){
var key = /https:\/\/www.youtube.com/;
var src = $(this).attr('src');
$(this).attr('src', $(this).attr('src'));
});
$(this).parents('.ays-pb-modals').find('video.wp-video-shortcode').each(function(){
if(typeof $(this).get(0) != 'undefined'){
if ( ! $(this).get(0).paused ) {
$(this).get(0).pause();
}
}
});
$(this).parents('.ays-pb-modals').find('audio.wp-audio-shortcode').each(function(){
if(typeof $(this).get(0) != 'undefined'){
if ( ! $(this).get(0).paused ) {
$(this).get(0).pause();
}
}
});
if(ays_pb_effectOut_2 != 'none'){
setTimeout(function(){
$(document).find('.ays-pb-modal_2').css('display', 'none');
$(document).find('.av_pop_modals_2').css('display', 'none');
$(document).find('.ays-pb-modal_2').attr('data-ays-flag','true');
if($('#ays_pb_close_sound_2').get(0) != undefined){
if(!$('#ays_pb_close_sound_2').get(0).paused){
$(document).find('.ays-pb-modal_2').css('display', 'none');
var audio = $('#ays_pb_close_sound_2').get(0);
audio.pause();
audio.currentTime = 0;
}
}
}, ays_pb_animation_close_speed);
}else{
$(document).find('.ays-pb-modal_2').css('display', 'none');
$(document).find('.av_pop_modals_2').css('display', 'none');
$(document).find('.ays-pb-modal_2').attr('data-ays-flag','true');
if($('#ays_pb_close_sound_2').get(0) != undefined){
if(!$('#ays_pb_close_sound_2').get(0).paused){
$(document).find('.ays-pb-modal_2').css('display', 'none');
var audio = $('#ays_pb_close_sound_2').get(0);
audio.pause();
audio.currentTime = 0;
}
}
}
$(document).find('#ays-pb-screen-shade_2').css({'opacity': '0', 'display': 'none'});
});
}
}
let count = 0;
if( ays_pb_scrollTop_2 !== 0 ){
$(window).scroll(function() {
if(($(this).scrollTop() >= ays_pb_scrollTop_2) && (count === 0)) {
count++;
if( ays_pb_delayOpen_2 !== 0 ){
$(document).find('.ays-pb-modal_2').css('animation-delay', ays_pb_delayOpen_2/1000);
setTimeout(function(){
$(document).find('.av_pop_modals_2').css('display','block');
$(document).find('.ays-pb-modal_2').addClass(ays_pb_effectIn_2);
$(document).find('.ays-pb-modal_2').css('display', 'block');
if (window.innerWidth < 768 && $(document).find('#ays-pb-screen-shade_2').attr('data-mobile-overlay') == 'true') {
$(document).find('#ays-pb-screen-shade_2').css({'opacity': '0.5'});
}
else{
$(document).find('#ays-pb-screen-shade_2').css({'opacity': '0.500000'});
}$(document).find('.ays-pb-modal-check_2').prop('checked', true);
}, ays_pb_delayOpen_2);
}else{
$(document).find('.av_pop_modals_2').css('display','block');
$(document).find('.ays-pb-modal_2').addClass(ays_pb_effectIn_2);
$(document).find('.ays-pb-modal_2').css('display', 'block');
if (window.innerWidth < 768 && $(document).find('#ays-pb-screen-shade_2').attr('data-mobile-overlay') == 'true') {
$(document).find('#ays-pb-screen-shade_2').css({'opacity': '0.5'});
}
else{
$(document).find('#ays-pb-screen-shade_2').css({'opacity': '0.500000'});
}$(document).find('.ays-pb-modal-check_2').prop('checked', true);
}
if('false' == 'true' && window.innerWidth < 768){
if(0 != 0 && 'off' != 'on'){
let close_button_delay_for_mobile = 0;
if (ays_pb_delayOpen_2 != 0) {
close_button_delay_for_mobile += Math.floor(ays_pb_delayOpen_2);
}
$(document).find('.ays-pb-modal-close_2').css({'display': 'none'});
setTimeout(function(){
$(document).find('.ays-pb-modal-close_2').css({'display': 'block'});
}, close_button_delay_for_mobile );
}
}
else {
if(0 != 0 && 'off' != 'on'){
let close_button_delay = 0;
if (ays_pb_delayOpen_2 != 0) {
close_button_delay += Math.floor(ays_pb_delayOpen_2);
}
$(document).find('.ays-pb-modal-close_2').css({'display': 'none'});
setTimeout(function(){
$(document).find('.ays-pb-modal-close_2').css({'display': 'block'});
}, close_button_delay );
}
}
if(5 != 0){
$(document).find('.ays-pb-modal_2').css({
'animation-duration': ays_pb_animation_close_seconds + 's'
});
let timer_pb_2 = setInterval(function(){
let newTime_pb_2 = time_pb_2--;
$(document).find('.ays_pb_timer_2 span').text(newTime_pb_2);
if(newTime_pb_2 <= 0){
$(document).find('.ays-pb-modal-close_2').trigger('click');
$(document).find('.ays-pb-modal_2').attr('class', 'ays-pb-modal ays-pb-modal-image-type-img ays-pb-modal_2 '+ays_pb_effectOut_2);
if(ays_pb_effectOut_2 != 'none'){
setTimeout(function(){
$(document).find('.ays-pb-modal_2').css('display', 'none');
$(document).find('.ays-pb-modal_2').attr('data-ays-flag','true');
}, ays_pb_animation_close_speed);
}else{
$(document).find('.ays-pb-modal_2').css('display', 'none');
$(document).find('.ays-pb-modal_2').attr('data-ays-flag','true');
}
clearInterval(timer_pb_2);
}
$(document).find('.ays-pb-modal-close_2').one('click', function(){
if (pbViewsFlag_2) {
var pb_id = 2;$.ajax({
url: pbLocalizeObj.ajax,
method: 'POST',
dataType: 'text',
data: {
id: pb_id,
action: 'ays_increment_pb_views',
},
});pbViewsFlag_2 = false;
}
$(document).find('.av_pop_modals_2').css('pointer-events', 'none');
$(document).find('.ays-pb-modal_2').attr('class', 'ays-pb-modal ays-pb-modal-image-type-img ays-pb-modal_2 ays-pb-border-mobile_2 '+ays_pb_effectOut_2);
$(this).parents('.ays-pb-modals').find('iframe').each(function(){
var key = /https:\/\/www.youtube.com/;
var src = $(this).attr('src');
$(this).attr('src', $(this).attr('src'));
});
$(this).parents('.ays-pb-modals').find('video.wp-video-shortcode').each(function(){
if(typeof $(this).get(0) != 'undefined'){
if ( ! $(this).get(0).paused ) {
$(this).get(0).pause();
}
}
});
$(this).parents('.ays-pb-modals').find('audio.wp-audio-shortcode').each(function(){
if(typeof $(this).get(0) != 'undefined'){
if ( ! $(this).get(0).paused ) {
$(this).get(0).pause();
}
}
});
if(ays_pb_effectOut_2 != 'none'){
setTimeout(function(){
$(document).find('.ays-pb-modal_2').css('display', 'none');
$(document).find('.av_pop_modals_2').css('display', 'none');
$(document).find('.ays-pb-modal_2').attr('data-ays-flag','true');
if($('#ays_pb_close_sound_2').get(0) != undefined){
if(!$('#ays_pb_close_sound_2').get(0).paused){
$(document).find('.ays-pb-modal_2').css('display', 'none');
var audio = $('#ays_pb_close_sound_2').get(0);
audio.pause();
audio.currentTime = 0;
}
}
}, ays_pb_animation_close_speed);
}else{
$(document).find('.ays-pb-modal_2').css('display', 'none');
$(document).find('.av_pop_modals_2').css('display', 'none');
$(document).find('.ays-pb-modal_2').attr('data-ays-flag','true');
if($('#ays_pb_close_sound_2').get(0) != undefined){
if(!$('#ays_pb_close_sound_2').get(0).paused){
$(document).find('.ays-pb-modal_2').css('display', 'none');
var audio = $('#ays_pb_close_sound_2').get(0);
audio.pause();
audio.currentTime = 0;
}
}
}
$(document).find('#ays-pb-screen-shade_2').css({'opacity': '0', 'display': 'none'});
clearInterval(timer_pb_2);
});
var ays_pb_flag = true;
$(document).on('keydown', function(event) {
if('1' && ays_pb_flag){
var escClosingPopups = $(document).find('.ays-pb-close-popup-with-esc:visible');
if (event.keyCode == 27) {
var topmostPopup = escClosingPopups.last();
topmostPopup.find('.ays-pb-modal-close_2').trigger('click');
ays_pb_flag = false;
}
} else {
ays_pb_flag = true;
}
});
},1000);
}
}
});
}else{
if( ays_pb_delayOpen_2 !== 0 ){
$(document).find('.ays-pb-modal_2').css('animation-delay', ays_pb_delayOpen_2/1000);
setTimeout(function(){
$(document).find('.av_pop_modals_2').css('display','block');
$(document).find('.ays-pb-modal_2').addClass(ays_pb_effectIn_2);
$(document).find('.ays-pb-modal_2').css('display', 'block');
if (window.innerWidth < 768 && $(document).find('#ays-pb-screen-shade_2').attr('data-mobile-overlay') == 'true') {
$(document).find('#ays-pb-screen-shade_2').css({'opacity': '0.5'});
}
else{
$(document).find('#ays-pb-screen-shade_2').css({'opacity': '0.500000'});
}
$(document).find('.ays-pb-modal-check_2').attr('checked', 'checked');if(isPageScrollDisabled){
$(document).find('body').addClass('pb_disable_scroll_2');
$(document).find('html').removeClass('pb_enable_scroll');
}}, ays_pb_delayOpen_2);
} else {
if($(document).find('.ays_pb_abt_2').val() != 'clickSelector'){
$(document).find('.av_pop_modals_2').css('display','block');
$(document).find('.ays-pb-modal_2').addClass(ays_pb_effectIn_2);
$(document).find('.ays-pb-modal_2').css('display', 'block');
if (window.innerWidth < 768 && $(document).find('#ays-pb-screen-shade_2').attr('data-mobile-overlay') == 'true') {
$(document).find('#ays-pb-screen-shade_2').css({'opacity': '0.5'});
}
else{
$(document).find('#ays-pb-screen-shade_2').css({'opacity': '0.500000'});
}
$(document).find('.ays-pb-modal-check_2').attr('checked', 'checked');if(isPageScrollDisabled){
$(document).find('body').addClass('pb_disable_scroll_2');
$(document).find('html').addClass('pb_disable_scroll_2');
}
}
}
}
if ('On' != 'On'){
$(document).find('#ays-pb-screen-shade_2').css({'opacity': '0', 'display': 'none !important', 'pointer-events': 'none', 'background': 'none'});
$(document).find('.ays-pb-modal_2').css('pointer-events', 'auto');
$(document).find('.av_pop_modals_2').css('pointer-events','none');
};
if($(document).find('.ays-pb-modals video').hasClass('wp-video-shortcode')){
var videoWidth = $(document).find('.ays-pb-modals video.wp-video-shortcode').attr('width');
var videoHeight = $(document).find('.ays-pb-modals video.wp-video-shortcode').attr('height');
setTimeout(function(){
$(document).find('.ays-pb-modals .wp-video').removeAttr('style');
$(document).find('.ays-pb-modals .mejs-container').removeAttr('style');
$(document).find('.ays-pb-modals video.wp-video-shortcode').removeAttr('style');$(document).find('.ays-pb-modals .wp-video').css({'width': '100%'});
$(document).find('.ays-pb-modals .mejs-container').css({'width': '100%','height': videoHeight + 'px'});
$(document).find('.ays-pb-modals video.wp-video-shortcode').css({'width': '100%','height': videoHeight + 'px'});
},1000);
}
if($(document).find('.ays-pb-modals iframe').attr('style') != ''){
setTimeout(function(){
$(document).find('.ays-pb-modals iframe').removeAttr('style');
},500);
}
// if(5 == 0){
if(closePopupOverlay && 'On' == 'On'){
$(document).find('.av_pop_modals_2').on('click', function(e) {
var pb_parent = $(this);
var pb_div = $(this).find('.ays-pb-modal_2');
if (!pb_div.is(e.target) && pb_div.has(e.target).length === 0){
$(document).find('.ays-pb-modal-close_2').click();
}
});
}
var ays_pb_flag = true;
$(document).on('keydown', function(event) {
if('1' && ays_pb_flag){
var escClosingPopups = $(document).find('.ays-pb-close-popup-with-esc:visible');
if (event.keyCode == 27) {
var topmostPopup = escClosingPopups.last();
topmostPopup.find('.ays-pb-modal-close_2').trigger('click');
ays_pb_flag = false;
}
} else {
ays_pb_flag = true;
}
});
// }
if('off' == 'on') {
var video = $(document).find('video.wp-video-shortcode');
for (let i = 0; i < video.length; i++) {
video[i].addEventListener('ended', function() {
if ($(this).next().val() === 'on') {
$(this).parents('.ays_video_window').find('.close-image-btn').trigger('click');
}
});
}
}
jQuery(document).on('click', '.ays-pb-modal-close_2', function() {
$(document).find('body').removeClass('pb_disable_scroll_2');
$(document).find('html').removeClass('pb_disable_scroll_2');
});});
})( jQuery );
if(typeof aysPopupOptions === "undefined"){
var aysPopupOptions = [];
}
aysPopupOptions["2"] = "eyJwb3B1cGJveCI6eyJpZCI6IjIiLCJ0aXRsZSI6IkFkIiwicG9wdXBfbmFtZSI6IiIsImRlc2NyaXB0aW9uIjoiRGVtbyBEZXNjcmlwdGlvbiIsImNhdGVnb3J5X2lkIjoiMSIsImF1dG9jbG9zZSI6IjUiLCJjb29raWUiOiIxNDQwIiwid2lkdGgiOjQwMCwiaGVpZ2h0Ijo1MDAsImJnY29sb3IiOiIjZmZmZmZmIiwidGV4dGNvbG9yIjoiIzAwMDAwMCIsImJvcmRlcnNpemUiOiIxIiwiYm9yZGVyY29sb3IiOiIjZmZmZmZmIiwiYm9yZGVyX3JhZGl1cyI6IjQiLCJzaG9ydGNvZGUiOiIiLCJ1c2Vyc19yb2xlIjoiW10iLCJjdXN0b21fY2xhc3MiOiIiLCJjdXN0b21fY3NzIjoiIiwiY3VzdG9tX2h0bWwiOiJIZXJlIGNhbiBiZSB5b3VyIGN1c3RvbSBIVE1MIG9yIFNob3J0Y29kZSIsIm9ub2Zmc3dpdGNoIjoiT24iLCJzaG93X29ubHlfZm9yX2F1dGhvciI6Im9mZiIsInNob3dfYWxsIjoiYWxsIiwiZGVsYXkiOiIzIiwic2Nyb2xsX3RvcCI6IjAiLCJhbmltYXRlX2luIjoiZmFkZUluIiwiYW5pbWF0ZV9vdXQiOiJmYWRlT3V0IiwiYWN0aW9uX2J1dHRvbiI6IiIsInZpZXdfcGxhY2UiOiIiLCJhY3Rpb25fYnV0dG9uX3R5cGUiOiJwYWdlTG9hZGVkIiwibW9kYWxfY29udGVudCI6ImltYWdlX3R5cGUiLCJ2aWV3X3R5cGUiOiJpbWFnZV90eXBlX2ltZ190aGVtZSIsIm9ub2Zmb3ZlcmxheSI6Ik9uIiwib3ZlcmxheV9vcGFjaXR5IjoiMC41MDAwMDAiLCJzaG93X3BvcHVwX3RpdGxlIjoiT2ZmIiwic2hvd19wb3B1cF9kZXNjIjoiT2ZmIiwiY2xvc2VfYnV0dG9uIjoib2ZmIiwiaGVhZGVyX2JnY29sb3IiOiIjZmZmZmZmIiwiYmdfaW1hZ2UiOiIiLCJsb2dfdXNlciI6Ik9uIiwiZ3Vlc3QiOiJPbiIsImFjdGl2ZV9kYXRlX2NoZWNrIjoib2ZmIiwiYWN0aXZlSW50ZXJ2YWwiOiIyMDI0LTA0LTE5IDE2OjA0OjE3IiwiZGVhY3RpdmVJbnRlcnZhbCI6IjIwMjQtMDQtMTkgMTY6MDQ6MTciLCJwYl9wb3NpdGlvbiI6ImNlbnRlci1jZW50ZXIiLCJwYl9tYXJnaW4iOiIwIiwidmlld3MiOiIyNTgxNyIsImNvbnZlcnNpb25zIjoiMCIsIm9wdGlvbnMiOiJ7XCJlbmFibGVfYmFja2dyb3VuZF9ncmFkaWVudFwiOlwib2ZmXCIsXCJiYWNrZ3JvdW5kX2dyYWRpZW50X2NvbG9yXzFcIjpcIiMwMDBcIixcImJhY2tncm91bmRfZ3JhZGllbnRfY29sb3JfMlwiOlwiI2ZmZlwiLFwicGJfZ3JhZGllbnRfZGlyZWN0aW9uXCI6XCJ2ZXJ0aWNhbFwiLFwiZW5hYmxlX2JhY2tncm91bmRfZ3JhZGllbnRfbW9iaWxlXCI6XCJvZmZcIixcImJhY2tncm91bmRfZ3JhZGllbnRfY29sb3JfMV9tb2JpbGVcIjpcIiMwMDBcIixcImJhY2tncm91bmRfZ3JhZGllbnRfY29sb3JfMl9tb2JpbGVcIjpcIiNmZmZcIixcInBiX2dyYWRpZW50X2RpcmVjdGlvbl9tb2JpbGVcIjpcInZlcnRpY2FsXCIsXCJleGNlcHRfcG9zdF90eXBlc1wiOltdLFwiZXhjZXB0X3Bvc3RzXCI6W10sXCJhbGxfcG9zdHNcIjpcIlwiLFwiY2xvc2VfYnV0dG9uX2RlbGF5XCI6MCxcImNsb3NlX2J1dHRvbl9kZWxheV9mb3JfbW9iaWxlXCI6MCxcImVuYWJsZV9jbG9zZV9idXR0b25fZGVsYXlfZm9yX21vYmlsZVwiOlwib2ZmXCIsXCJlbmFibGVfcGJfc291bmRcIjpcIm9mZlwiLFwib3ZlcmxheV9jb2xvclwiOlwiIzAwMFwiLFwiZW5hYmxlX292ZXJsYXlfY29sb3JfbW9iaWxlXCI6XCJvZmZcIixcIm92ZXJsYXlfY29sb3JfbW9iaWxlXCI6XCIjMDAwXCIsXCJhbmltYXRpb25fc3BlZWRcIjoxLFwiZW5hYmxlX2FuaW1hdGlvbl9zcGVlZF9tb2JpbGVcIjpcIm9mZlwiLFwiYW5pbWF0aW9uX3NwZWVkX21vYmlsZVwiOjEsXCJjbG9zZV9hbmltYXRpb25fc3BlZWRcIjoxLFwiZW5hYmxlX2Nsb3NlX2FuaW1hdGlvbl9zcGVlZF9tb2JpbGVcIjpcIm9mZlwiLFwiY2xvc2VfYW5pbWF0aW9uX3NwZWVkX21vYmlsZVwiOjEsXCJwYl9tb2JpbGVcIjpcIm9mZlwiLFwiY2xvc2VfYnV0dG9uX3RleHRcIjpcIlxcdTI3MTVcIixcImVuYWJsZV9jbG9zZV9idXR0b25fdGV4dF9tb2JpbGVcIjpcIm9uXCIsXCJjbG9zZV9idXR0b25fdGV4dF9tb2JpbGVcIjpcIlxcdTI3MTVcIixcImNsb3NlX2J1dHRvbl9ob3Zlcl90ZXh0XCI6XCJcIixcIm1vYmlsZV93aWR0aFwiOlwiXCIsXCJtb2JpbGVfbWF4X3dpZHRoXCI6XCJcIixcIm1vYmlsZV9oZWlnaHRcIjpcIlwiLFwiY2xvc2VfYnV0dG9uX3Bvc2l0aW9uXCI6XCJyaWdodC10b3BcIixcImVuYWJsZV9jbG9zZV9idXR0b25fcG9zaXRpb25fbW9iaWxlXCI6XCJvZmZcIixcImNsb3NlX2J1dHRvbl9wb3NpdGlvbl9tb2JpbGVcIjpcInJpZ2h0LXRvcFwiLFwic2hvd19vbmx5X29uY2VcIjpcIm9mZlwiLFwic2hvd19vbl9ob21lX3BhZ2VcIjpcIm9mZlwiLFwiY2xvc2VfcG9wdXBfZXNjXCI6XCJvblwiLFwicG9wdXBfd2lkdGhfYnlfcGVyY2VudGFnZV9weFwiOlwicGl4ZWxzXCIsXCJwb3B1cF9jb250ZW50X3BhZGRpbmdcIjowLFwicG9wdXBfcGFkZGluZ19ieV9wZXJjZW50YWdlX3B4XCI6XCJwaXhlbHNcIixcInBiX2ZvbnRfZmFtaWx5XCI6XCJpbmhlcml0XCIsXCJjbG9zZV9wb3B1cF9vdmVybGF5XCI6XCJvblwiLFwiY2xvc2VfcG9wdXBfb3ZlcmxheV9tb2JpbGVcIjpcIm9uXCIsXCJlbmFibGVfcGJfZnVsbHNjcmVlblwiOlwib2ZmXCIsXCJlbmFibGVfaGlkZV90aW1lclwiOlwib2ZmXCIsXCJlbmFibGVfaGlkZV90aW1lcl9tb2JpbGVcIjpcIm9mZlwiLFwiZW5hYmxlX2F1dG9jbG9zZV9vbl9jb21wbGV0aW9uXCI6XCJvZmZcIixcImVuYWJsZV9zb2NpYWxfbGlua3NcIjpcIm9mZlwiLFwic29jaWFsX2xpbmtzXCI6e1wibGlua2VkaW5fbGlua1wiOlwiXCIsXCJmYWNlYm9va19saW5rXCI6XCJcIixcInR3aXR0ZXJfbGlua1wiOlwiXCIsXCJ2a29udGFrdGVfbGlua1wiOlwiXCIsXCJ5b3V0dWJlX2xpbmtcIjpcIlwiLFwiaW5zdGFncmFtX2xpbmtcIjpcIlwiLFwiYmVoYW5jZV9saW5rXCI6XCJcIn0sXCJzb2NpYWxfYnV0dG9uc19oZWFkaW5nXCI6XCJcIixcImNsb3NlX2J1dHRvbl9zaXplXCI6MSxcImNsb3NlX2J1dHRvbl9pbWFnZVwiOlwiXCIsXCJib3JkZXJfc3R5bGVcIjpcInNvbGlkXCIsXCJlbmFibGVfYm9yZGVyX3N0eWxlX21vYmlsZVwiOlwib2ZmXCIsXCJib3JkZXJfc3R5bGVfbW9iaWxlXCI6XCJzb2xpZFwiLFwiYXlzX3BiX2hvdmVyX3Nob3dfY2xvc2VfYnRuXCI6XCJvZmZcIixcImRpc2FibGVfc2Nyb2xsXCI6XCJvZmZcIixcImRpc2FibGVfc2Nyb2xsX21vYmlsZVwiOlwib2ZmXCIsXCJlbmFibGVfb3Blbl9kZWxheV9tb2JpbGVcIjpcIm9mZlwiLFwib3Blbl9kZWxheV9tb2JpbGVcIjpcIjBcIixcImVuYWJsZV9zY3JvbGxfdG9wX21vYmlsZVwiOlwib2ZmXCIsXCJzY3JvbGxfdG9wX21vYmlsZVwiOlwiMFwiLFwiZW5hYmxlX3BiX3Bvc2l0aW9uX21vYmlsZVwiOlwib2ZmXCIsXCJwYl9wb3NpdGlvbl9tb2JpbGVcIjpcImNlbnRlci1jZW50ZXJcIixcInBiX2JnX2ltYWdlX3Bvc2l0aW9uXCI6XCJjZW50ZXItY2VudGVyXCIsXCJlbmFibGVfcGJfYmdfaW1hZ2VfcG9zaXRpb25fbW9iaWxlXCI6XCJvZmZcIixcInBiX2JnX2ltYWdlX3Bvc2l0aW9uX21vYmlsZVwiOlwiY2VudGVyLWNlbnRlclwiLFwicGJfYmdfaW1hZ2Vfc2l6aW5nXCI6XCJjb3ZlclwiLFwiZW5hYmxlX3BiX2JnX2ltYWdlX3NpemluZ19tb2JpbGVcIjpcIm9mZlwiLFwicGJfYmdfaW1hZ2Vfc2l6aW5nX21vYmlsZVwiOlwiY292ZXJcIixcInZpZGVvX3RoZW1lX3VybFwiOlwiXCIsXCJpbWFnZV90eXBlX2ltZ19zcmNcIjpcImh0dHBzOlxcXC9cXFwvd3d3LnVuaXF1ZW5ld3NvbmxpbmUuY29tXFxcL3dwLWNvbnRlbnRcXFwvdXBsb2Fkc1xcXC8yMDI0XFxcLzA0XFxcL2Jhbm5lci1zYXRzc3BvcnRzLmpwZ1wiLFwiaW1hZ2VfdHlwZV9pbWdfcmVkaXJlY3RfdXJsXCI6XCJodHRwczpcXFwvXFxcL3d3dy5zYXRzcG9ydC5jb21cXFwveFxcXC8jXFxcLzJcXFwvaG9tZVxcXC9leGNoYW5nZVxcXC9zcG9ydFxcXC9hbGw/c2lnbnVwPXRydWUmdXRtX3NvdXJjZT11bmlxdWVuZXdzb25saW5lJnV0bV9tZWRpdW09dW5pcXVlbmV3c29ubGluZVwiLFwiZmFjZWJvb2tfcGFnZV91cmxcIjpcImh0dHBzOlxcXC9cXFwvd3d3LmZhY2Vib29rLmNvbVxcXC93b3JkcHJlc3NcIixcImhpZGVfZmJfcGFnZV9jb3Zlcl9waG90b1wiOlwib2ZmXCIsXCJub3RpZmljYXRpb25fdHlwZV9jb21wb25lbnRzXCI6W10sXCJub3RpZmljYXRpb25fdHlwZV9jb21wb25lbnRzX29yZGVyXCI6e1wibWFpbl9jb250ZW50XCI6XCJtYWluX2NvbnRlbnRcIixcImJ1dHRvbl8xXCI6XCJidXR0b25fMVwifSxcIm5vdGlmaWNhdGlvbl9tYWluX2NvbnRlbnRcIjpcIldyaXRlIHRoZSBjdXN0b20gbm90aWZpY2F0aW9uIGJhbm5lciB0ZXh0IGhlcmUuXCIsXCJub3RpZmljYXRpb25fYnV0dG9uXzFfdGV4dFwiOlwiQ2xpY2shXCIsXCJub3RpZmljYXRpb25fYnV0dG9uXzFfcmVkaXJlY3RfdXJsXCI6XCJcIixcInBiX21heF9oZWlnaHRcIjpcIlwiLFwicG9wdXBfbWF4X2hlaWdodF9ieV9wZXJjZW50YWdlX3B4XCI6XCJwaXhlbHNcIixcInBiX21heF9oZWlnaHRfbW9iaWxlXCI6XCJcIixcInBvcHVwX21heF9oZWlnaHRfYnlfcGVyY2VudGFnZV9weF9tb2JpbGVcIjpcInBpeGVsc1wiLFwicGJfbWluX2hlaWdodFwiOlwiXCIsXCJwYl9mb250X3NpemVcIjoxMyxcInBiX2ZvbnRfc2l6ZV9mb3JfbW9iaWxlXCI6MTMsXCJwYl90aXRsZV90ZXh0X3NoYWRvd1wiOlwicmdiYSgyNTUsMjU1LDI1NSwwKVwiLFwiZW5hYmxlX3BiX3RpdGxlX3RleHRfc2hhZG93XCI6XCJvZmZcIixcInBiX3RpdGxlX3RleHRfc2hhZG93X3hfb2Zmc2V0XCI6MixcInBiX3RpdGxlX3RleHRfc2hhZG93X3lfb2Zmc2V0XCI6MixcInBiX3RpdGxlX3RleHRfc2hhZG93X3pfb2Zmc2V0XCI6MCxcInBiX3RpdGxlX3RleHRfc2hhZG93X21vYmlsZVwiOlwicmdiYSgyNTUsMjU1LDI1NSwwKVwiLFwiZW5hYmxlX3BiX3RpdGxlX3RleHRfc2hhZG93X21vYmlsZVwiOlwib2ZmXCIsXCJwYl90aXRsZV90ZXh0X3NoYWRvd194X29mZnNldF9tb2JpbGVcIjoyLFwicGJfdGl0bGVfdGV4dF9zaGFkb3dfeV9vZmZzZXRfbW9iaWxlXCI6MixcInBiX3RpdGxlX3RleHRfc2hhZG93X3pfb2Zmc2V0X21vYmlsZVwiOjAsXCJjcmVhdGVfZGF0ZVwiOlwiMjAyNC0wNC0xNyAyMDoyOTo1NlwiLFwiY3JlYXRlX2F1dGhvclwiOjMsXCJhdXRob3JcIjpcIntcXFwiaWRcXFwiOlxcXCIzXFxcIixcXFwibmFtZVxcXCI6XFxcIkRyLiBZb2dlbmRyYSBEZXN3YXJcXFwifVwiLFwiZW5hYmxlX2Rpc21pc3NcIjpcIm9mZlwiLFwiZW5hYmxlX2Rpc21pc3NfdGV4dFwiOlwiRGlzbWlzcyBhZFwiLFwiZW5hYmxlX2Rpc21pc3NfbW9iaWxlXCI6XCJvZmZcIixcImVuYWJsZV9kaXNtaXNzX3RleHRfbW9iaWxlXCI6XCJEaXNtaXNzIGFkXCIsXCJlbmFibGVfYm94X3NoYWRvd1wiOlwib2ZmXCIsXCJlbmFibGVfYm94X3NoYWRvd19tb2JpbGVcIjpcIm9mZlwiLFwiYm94X3NoYWRvd19jb2xvclwiOlwiIzAwMFwiLFwiYm94X3NoYWRvd19jb2xvcl9tb2JpbGVcIjpcIiMwMDBcIixcInBiX2JveF9zaGFkb3dfeF9vZmZzZXRcIjowLFwicGJfYm94X3NoYWRvd194X29mZnNldF9tb2JpbGVcIjowLFwicGJfYm94X3NoYWRvd195X29mZnNldFwiOjAsXCJwYl9ib3hfc2hhZG93X3lfb2Zmc2V0X21vYmlsZVwiOjAsXCJwYl9ib3hfc2hhZG93X3pfb2Zmc2V0XCI6MTUsXCJwYl9ib3hfc2hhZG93X3pfb2Zmc2V0X21vYmlsZVwiOjE1LFwiZGlzYWJsZV9zY3JvbGxfb25fcG9wdXBcIjpcIm9mZlwiLFwiZGlzYWJsZV9zY3JvbGxfb25fcG9wdXBfbW9iaWxlXCI6XCJvZmZcIixcInNob3dfc2Nyb2xsYmFyXCI6XCJvZmZcIixcImhpZGVfb25fcGNcIjpcIm9mZlwiLFwiaGlkZV9vbl90YWJsZXRzXCI6XCJvZmZcIixcInBiX2JnX2ltYWdlX2RpcmVjdGlvbl9vbl9tb2JpbGVcIjpcIm9uXCIsXCJjbG9zZV9idXR0b25fY29sb3JcIjpcIiMwMDAwMDBcIixcImNsb3NlX2J1dHRvbl9ob3Zlcl9jb2xvclwiOlwiIzAwMDAwMFwiLFwiYmx1cmVkX292ZXJsYXlcIjpcIm9mZlwiLFwiYmx1cmVkX292ZXJsYXlfbW9iaWxlXCI6XCJvZmZcIixcInBiX2F1dG9jbG9zZV9tb2JpbGVcIjpcIjBcIixcImVuYWJsZV9hdXRvY2xvc2VfZGVsYXlfdGV4dF9tb2JpbGVcIjpcIm9mZlwiLFwiZW5hYmxlX292ZXJsYXlfdGV4dF9tb2JpbGVcIjpcIm9mZlwiLFwib3ZlcmxheV9tb2JpbGVfb3BhY2l0eVwiOlwiMC41XCIsXCJzaG93X3BvcHVwX3RpdGxlX21vYmlsZVwiOlwiT2ZmXCIsXCJzaG93X3BvcHVwX2Rlc2NfbW9iaWxlXCI6XCJPZmZcIixcImVuYWJsZV9hbmltYXRlX2luX21vYmlsZVwiOlwib2ZmXCIsXCJhbmltYXRlX2luX21vYmlsZVwiOlwiZmFkZUluXCIsXCJlbmFibGVfYW5pbWF0ZV9vdXRfbW9iaWxlXCI6XCJvZmZcIixcImFuaW1hdGVfb3V0X21vYmlsZVwiOlwiZmFkZU91dFwiLFwiZW5hYmxlX2Rpc3BsYXlfY29udGVudF9tb2JpbGVcIjpcIm9mZlwiLFwiZW5hYmxlX2JnY29sb3JfbW9iaWxlXCI6XCJvZmZcIixcImJnY29sb3JfbW9iaWxlXCI6XCIjZmZmZmZmXCIsXCJlbmFibGVfYmdfaW1hZ2VfbW9iaWxlXCI6XCJvZmZcIixcImJnX2ltYWdlX21vYmlsZVwiOlwiXCIsXCJlbmFibGVfYm9yZGVyY29sb3JfbW9iaWxlXCI6XCJvZmZcIixcImJvcmRlcmNvbG9yX21vYmlsZVwiOlwiI2ZmZmZmZlwiLFwiZW5hYmxlX2JvcmRlcnNpemVfbW9iaWxlXCI6XCJvZmZcIixcImJvcmRlcnNpemVfbW9iaWxlXCI6XCIxXCIsXCJlbmFibGVfYm9yZGVyX3JhZGl1c19tb2JpbGVcIjpcIm9mZlwiLFwiYm9yZGVyX3JhZGl1c19tb2JpbGVcIjpcIjRcIn0iLCJzaG93X3BvcHVwX3RpdGxlX21vYmlsZSI6Ik9mZiIsInNob3dfcG9wdXBfZGVzY19tb2JpbGUiOiJPZmYifX0=";
!function(){const e=document.createElement("script");e.async=!0,e.setAttribute("crossorigin","anonymous"),e.src="//pagead2.googlesyndication.com/pagead/js/adsbygoogle.js?client=ca-pub-9548258067481809";let t=0;document.addEventListener("mousemove",function(){1==++t&&document.getElementsByTagName("HEAD").item(0).appendChild(e)}),window.onscroll=function(n){1==++t&&document.getElementsByTagName("HEAD").item(0).appendChild(e)},setTimeout(function(){0===t&&(t++,document.getElementsByTagName("HEAD").item(0).appendChild(e))},5e3)}();
https://www.uniquenewsonline.com/wp-content/plugins/theia-sticky-sidebar/js/ResizeSensor.js
https://www.uniquenewsonline.com/wp-content/plugins/theia-sticky-sidebar/js/theia-sticky-sidebar.js
https://www.uniquenewsonline.com/wp-content/plugins/theia-sticky-sidebar/js/main.js
https://www.uniquenewsonline.com/wp-content/themes/zox-news/js/mvpcustom.js
jQuery(document).ready(function($) {
var leaderHeight = $("#mvp-leader-wrap").outerHeight();
var navHeight = $("#mvp-main-head-wrap").outerHeight();
var headerHeight = navHeight + leaderHeight;
var previousScroll = 0;
$(window).scroll(function(event){
var scroll = $(this).scrollTop();
if ( typeof leaderHeight !== "undefined" ) {
if ($(window).scrollTop() > headerHeight){
$("#mvp-main-nav-small").addClass("mvp-nav-small-fixed");
$("#mvp-main-body-wrap").css("margin-top", navHeight );
} else {
$("#mvp-main-nav-small").removeClass("mvp-nav-small-fixed");
$("#mvp-main-body-wrap").css("margin-top","0");
}
if ($(window).scrollTop() > headerHeight + 50){
$("#mvp-main-nav-small").addClass("mvp-fixed");
$("#mvp-main-nav-small").addClass("mvp-fixed-shadow");
$(".mvp-fly-top").addClass("mvp-to-top");
if(scroll < previousScroll) {
$("#mvp-main-nav-small").removeClass("mvp-soc-mob-up");
$("#mvp-soc-mob-wrap").removeClass("mvp-soc-mob-up");
$(".mvp-drop-nav-title").removeClass("mvp-nav-small-post");
$(".mvp-nav-menu").show();
} else {
$("#mvp-main-nav-small").addClass("mvp-soc-mob-up");
$("#mvp-soc-mob-wrap").addClass("mvp-soc-mob-up");
$(".mvp-drop-nav-title").addClass("mvp-nav-small-post");
$(".mvp-nav-menu").hide();
}
} else {
$("#mvp-main-nav-small").removeClass("mvp-fixed");
$("#mvp-main-nav-small").removeClass("mvp-fixed-shadow");
$(".mvp-fly-top").removeClass("mvp-to-top");
}
} else {
if ($(window).scrollTop() > navHeight){
$("#mvp-main-nav-small").addClass("mvp-nav-small-fixed");
$("#mvp-main-body-wrap").css("margin-top", navHeight );
} else {
$("#mvp-main-nav-small").removeClass("mvp-nav-small-fixed");
$("#mvp-main-body-wrap").css("margin-top","0");
}
if ($(window).scrollTop() > navHeight + 50){
$("#mvp-main-nav-small").addClass("mvp-fixed");
$("#mvp-main-nav-small").addClass("mvp-fixed-shadow");
$(".mvp-fly-top").addClass("mvp-to-top");
if(scroll < previousScroll) {
$("#mvp-main-nav-small").removeClass("mvp-soc-mob-up");
$("#mvp-soc-mob-wrap").removeClass("mvp-soc-mob-up");
$(".mvp-drop-nav-title").removeClass("mvp-nav-small-post");
$(".mvp-nav-menu").show();
} else {
$("#mvp-main-nav-small").addClass("mvp-soc-mob-up");
$("#mvp-soc-mob-wrap").addClass("mvp-soc-mob-up");
$(".mvp-drop-nav-title").addClass("mvp-nav-small-post");
$(".mvp-nav-menu").hide();
}
} else {
$("#mvp-main-nav-small").removeClass("mvp-fixed");
$("#mvp-main-nav-small").removeClass("mvp-fixed-shadow");
$(".mvp-fly-top").removeClass("mvp-to-top");
}
}
previousScroll = scroll;
});
});jQuery(document).ready(function($) {
// Video Post Scroll
$(window).on("scroll.video", function(event){
var scrollTop = $(window).scrollTop();
var elementOffset = $("#mvp-content-wrap").offset().top;
var distance = (elementOffset - scrollTop);
var aboveHeight = $("#mvp-video-embed-wrap").outerHeight();
if ($(window).scrollTop() > distance + aboveHeight + screen.height){
$("#mvp-video-embed-cont").addClass("mvp-vid-fixed");
$("#mvp-video-embed-wrap").addClass("mvp-vid-height");
$(".mvp-video-close").show();
} else {
$("#mvp-video-embed-cont").removeClass("mvp-vid-fixed");
$("#mvp-video-embed-wrap").removeClass("mvp-vid-height");
$(".mvp-video-close").hide();
}
});$(".mvp-video-close").on("click", function(){
$("#mvp-video-embed-cont").removeClass("mvp-vid-fixed");
$("#mvp-video-embed-wrap").removeClass("mvp-vid-height");
$(".mvp-video-close").hide();
$(window).off("scroll.video");
});});jQuery(document).ready(function($) {
// Mobile Social Buttons More
$(".mvp-soc-mob-right").on("click", function(){
$("#mvp-soc-mob-wrap").toggleClass("mvp-soc-mob-more");
});
});jQuery(document).ready(function($) {
$(".menu-item-has-children a").click(function(event){
event.stopPropagation();});$(".menu-item-has-children").click(function(){
$(this).addClass("toggled");
if($(".menu-item-has-children").hasClass("toggled"))
{
$(this).children("ul").toggle();
$(".mvp-fly-nav-menu").getNiceScroll().resize();
}
$(this).toggleClass("tog-minus");
return false;
});// Main Menu Scroll
$(".mvp-fly-nav-menu").niceScroll({cursorcolor:"#888",cursorwidth: 7,cursorborder: 0,zindex:999999});
});
https://www.uniquenewsonline.com/wp-content/themes/zox-news/js/scripts.js
https://www.uniquenewsonline.com/wp-content/themes/zox-news/js/retina.js
https://www.uniquenewsonline.com/wp-content/themes/zox-news/js/flexslider.js
https://www.uniquenewsonline.com/wp-includes/js/comment-reply.min.js
(function(w,d, s, id) {w.webpushr=w.webpushr||function(){(w.webpushr.q=w.webpushr.q||[]).push(arguments)};var js, fjs = d.getElementsByTagName(s)[0];js = d.createElement(s); js.async=1; js.id = id;js.src = "https://cdn.webpushr.com/app.min.js";
d.body.appendChild(js);}(window,document, 'script', 'webpushr-jssdk'));
webpushr('setup',{'key':'BPjbvHzuEYRqFV4yiEu3fIxgQ_hu6jxsQjNdj6baiXPpbFathx1pQk1KL7M1lXEoliGJckK0dG6UeYUZuTIiCRQ','sw':'https://www.uniquenewsonline.com/wp-content/plugins/webpushr-web-push-notifications/sdk_files/webpushr-sw.js.php'});
window.lazyLoadOptions = {
elements_selector: "iframe[data-lazy-src]",
data_src: "lazy-src",
data_srcset: "lazy-srcset",
data_sizes: "lazy-sizes",
class_loading: "lazyloading",
class_loaded: "lazyloaded",
threshold: 300,
callback_loaded: function(element) {
if ( element.tagName === "IFRAME" && element.dataset.rocketLazyload == "fitvidscompatible" ) {
if (element.classList.contains("lazyloaded") ) {
if (typeof window.jQuery != "undefined") {
if (jQuery.fn.fitVids) {
jQuery(element).parent().fitVids();
}
}
}
}
}};
window.addEventListener('LazyLoad::Initialized', function (e) {
var lazyLoadInstance = e.detail.instance;if (window.MutationObserver) {
var observer = new MutationObserver(function(mutations) {
var image_count = 0;
var iframe_count = 0;
var rocketlazy_count = 0;mutations.forEach(function(mutation) {
for (i = 0; i < mutation.addedNodes.length; i++) {
if (typeof mutation.addedNodes[i].getElementsByTagName !== 'function') {
return;
}if (typeof mutation.addedNodes[i].getElementsByClassName !== 'function') {
return;
}images = mutation.addedNodes[i].getElementsByTagName('img');
is_image = mutation.addedNodes[i].tagName == "IMG";
iframes = mutation.addedNodes[i].getElementsByTagName('iframe');
is_iframe = mutation.addedNodes[i].tagName == "IFRAME";
rocket_lazy = mutation.addedNodes[i].getElementsByClassName('rocket-lazyload');image_count += images.length;
iframe_count += iframes.length;
rocketlazy_count += rocket_lazy.length;if(is_image){
image_count += 1;
}if(is_iframe){
iframe_count += 1;
}
}
} );if(image_count > 0 || iframe_count > 0 || rocketlazy_count > 0){
lazyLoadInstance.update();
}
} );var b = document.getElementsByTagName("body")[0];
var config = { childList: true, subtree: true };observer.observe(b, config);
}
}, false);
https://www.uniquenewsonline.com/wp-content/plugins/rocket-lazy-load/assets/js/16.1/lazyload.min.js