A cocktail of dread and guilt sometimes keeps me from going deep into my fridge. I have to move bunches of carrots and kale back to their designated shelves, and the takeout containers need to be stacked and labeled. And there, once hidden in the very back corner is a mushy, forgotten, aggressively decomposing head of lettuce. Those were some beautiful little gems, I sigh as I turn the near-liquid bag of green slop into my compost bin. I’ve watched so many once-perfect pieces of produce meet the same fate. I know if I was just a little more organized, I’d never have to deal with any of this.
Even before the pandemic, I cooked at home a lot, so I really had no excuse for letting perfectly good produce (and dairy, and okay yes, also some condiments) get lost in my not-very-big refrigerator. But organizing the fridge isn’t exactly like tidying up and putting the rest of the house in order. All those expiration dates — some in writing, some you just have to guess by sight or smell — can turn the fridge into a stage for anxiety. I genuinely enjoy the organizing itself, but I hate the idea of coming across food I’ve let go to waste. Sometimes in anticipation of this feeling, I’ll put the whole ordeal off until, well, the lettuce turns to goo and I have no choice but to clear it out. Reader, I put my head in the sand.
As I shelter in place, I’m really trying to stay on top of fridge organization, so I never have to tackle it in one dreaded evening, and — more importantly — so that I don’t waste any food. The truth is that organizing the fridge is neither complicated nor intimidating. It’s getting started that can take a little nudge. Consider this your nudge, and go forth with confidence as you label, shuffle, and give your fridge the makeover it deserves.
Advertisement
Start with a scrub down.
Okay, maybe not a full-on scrub down, but before getting into organization, you’ll want to start with a clean fridge. Take everything out that can safely sit at room temperature for an hour (this won’t take that long, don’t worry). Push everything else into the back corner, so you can clean around and underneath it when the time comes. Start by pulling out the bins, and shaking all of those old parsley leaves and carrot tops into the trash. You can wash the bins in your sink if you have space, but in my small apartment I usually just wipe them down.
I use a natural all-purpose cleaning solution, but don’t stress if you don’t have something like that around. You can use a diluted combination of (roughly) one part white vinegar to one part water to cut through those little bits of hot sauce and sesame oil on your shelves. A cleaning solution will also help rid the fridge of any mildewy or otherwise-unpleasant smells. Use a paper or cloth towel to wipe the fridge floor, the shelves, the roof, and any other nooks and crannies. Realistically, you’re not going to do this more than once every six months, so make it count.
If it needs to be thrown away… throw it away.
There’s not a lot to say here, but it does need to be said: If you’ve left something in the fridge too long, and it’s past the point of return, just throw it out. It’s tempting to keep that sad, limp broccoli for another week, thinking you might make a soup. If you have a real plan, keep it! If not, throw it away, and take note of what produce you use most slowly before buying more.
Advertisement
Designate shelf space by category.
I’m not going to tell you where you should put your cabbage, or which side of the fridge eggs go on. But generally speaking, life will be a lot easier if you designate certain shelves for certain foods. I learn and unlearn this lesson monthly. It takes finding something particularly spoiled under a pile of Brussels sprouts (which I’m convinced pretty much never go bad) to remind me that I should really start putting things where they belong again.
Keeping vegetables in the crisper drawers is a good place to start, and go from there. Maybe you decide to keep takeout, leftovers, and packaged foods on a top shelf, or front and center where you can reach them easily. I keep meat on the bottom shelf, so that it doesn’t ruin a week’s worth of vegetables on the off chance that it drips. Small bottles and condiments usually take their place in the fridge door’s shelves.
As your fridge fills up, you might decide some foods belong in the freezer. It’s never a bad idea to freeze meat, and lots of vegetables and fruits also freeze well. I don’t have the luxury of a large freezer, but if I did, I’d be freezing berries, sliced bread, and jars of cooked beans. The list goes on.
Advertisement
Use sturdy containers and bags.
Everything in the fridge will last a lot longer if you have some good containers and bags for storing produce and cooked foods. Mason jars are great for all sorts of storage, but you’ll want to have a few other options, for foods that might not fit so gracefully into a jar. Glass containers with lids that snap shut are great for cooked foods, because they keep a seal and have plenty of surface area. It’s also a good idea to put vegetables and leafy greens in reusable bags, where they’ll stay crisp and lovely for at least a few days longer than if you just chucked them in there unprotected.
You’re not just keeping food fresh by storing it in containers. If you put particularly pungent foods (like cut onions) in the fridge with no barrier between them and everything else, you’re going to have a lot of foods that unintentionally taste like onions in the coming days.
Label as much as you can.
If you’ve never worked in a restaurant kitchen, you might not think of blue masking tape and sharpies as part of the cook’s domain — they are. You can measure a chef by how well they label and keep track of everything in their refrigerator. By that measure, I’m a less-than-great cook, but I’m working on it. Don’t commit to labeling every single thing that goes into your fridge, unless you’re That Person, and you’ll stick with the program. Me, I only label containers I anticipate forgetting about, along with those containing grains and cooked foods that need to be used before they spoil.
Advertisement
As shelter-in-place continues to warp the concept of time, it’s important to remember you brought that takeout home two Mondays ago, not one. If you commit to keeping a running list on the outside of your fridge (see below), this step isn’t quite as important, but it still makes it much easier to quickly sort through your perishables and leftovers and decide what needs to be eaten or cooked next.
Make a list.
Once the fridge is nice and clean, use pen and paper to take note of each item as you put it back in its designated place and, if necessary, appropriate container. Attach this inventory list to the outside of your fridge. It doesn’t have to be a super-long, comprehensive list of every single thing you’ve ever put in there. Think of it more like a running list of your week’s groceries. Jot down perishables, note the date you put them in there, and cross each item off as you use it. If you want to go above and beyond, note how much of each ingredient you have. This process will add a little more work on the front end as you load things in, but it will make your life easier in the long run.
Advertisement
Advertisement
A list taped to the fridge will help you keep track of everything inside.Elazar Sontag
My mother, the patron saint of kitchen organization, doesn’t quite use this method, but she’ll tack her shopping list to the fridge, and jot down a few recipe ideas for each perishable item. That works well, too.
Advertisement
Think about breaking your list up into useful sections — produce, dairy, condiments, for instance — so you can easily check what you’ve got available, and what needs to be used next. Having this inventory available will also make writing up your next grocery list much easier. Is it possible you’ll still forget about something and let it rot for a few weeks? Probably. But with a little extra organization, you have a fighting chance of using everything before it goes bad.
This list will prove even more useful when organizing the freezer, since it’s particularly easy to lose and forget about food in there.
Make a game plan for your food.
This will feel more realistic and doable on some days than on others, but making a game plan for the ingredients in your fridge will help you work through produce, use up the last of a condiment or jug of milk, and create space for your next grocery haul. I’m not saying you should be thinking a week out, with a recipe planned for every meal. If that’s how your brain works, I envy you, and you probably aren’t reading this guide to begin with. But if you’re more like me, you’re still planning for today and tomorrow. That’s okay.
Advertisement
Think about some building blocks that’ll simultaneously use up anything on its last leg, and get you through the week. Use the last shallot to make a salad dressing that’ll keep in the fridge for an extra week. Roast carrots, broccoli, and other hearty vegetables together with olive oil, salt, and pepper, and store them in one of the snap-lid glass containers you purchased. Turn any sad-looking herbs into an improvised green sauce (go heavy on olive oil, lemon, and chile flakes), that’ll give them another lease on life, and is sure to be delicious on pretty much everything.
The idea here isn’t to meal prep for the week. You’re preparing some of your staple foods in very basic ways, so they’re available to you when cooking doesn’t feel like an option, or you just don’t have time.
Don’t get discouraged.
Generally, not stressing is… not my forte. But when it comes to organizing and maintaining the order of what is essentially just a very cold closet, try not to stress yourself out too much. Wasting food is a huge bummer, and it’s frustrating to lose a head of fennel in the black hole that is a messy fridge, but some days are going to be better than others.
Advertisement
Sometimes I don’t have the patience to put half an onion in a glass container, and it ends up cut side down on a little plate in the fridge where it makes absolutely everything else taste like onion. More often than not, kale skips the produce bag and gets squeezed into the crisper drawer. I use it the next day, and everything is fine. Every once in a while, I still come upon a poor head of lettuce that’s been sitting in there for who knows how long. I feel those pangs of shame, but I bounce back a little faster these days. There’s always tomorrow to clean out the fridge, write a new list, and try again.
(Note: This is a Article Automatically Generated Through Syndication, Here is The Original Source
Passionate news enthusiast with a flair for words. Our Editorial Team author brings you the latest updates, in-depth analysis, and engaging stories. Stay informed with their well-researched articles.
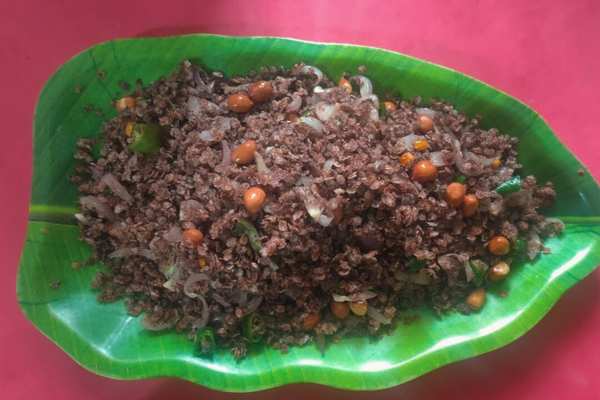
Ragi Poha is one of the most popular breakfast and evening snack options in India. It is loaded with protein and healthy fats which help in retaining muscle mass by slowing down the ageing process. The popularity of finger millets has grown tremendously in the last few years being 2023 claimed as the “International Year of Millets.”
Therefore, people are slowly switching from wheat and rice to finger millet for its exceptional health benefits. Here is one easy and quick high-protein Ragi Poha recipe to start your day with or fulfill your cravings with. Cook and serve warm!
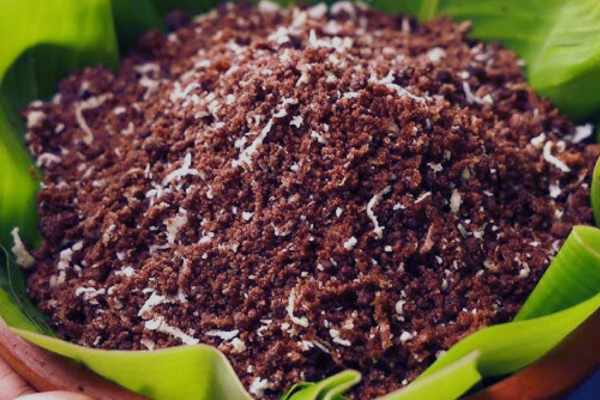
Every morning people think about what to have for breakfast. In that context, Dal Appe fits in. It is a mouthwatering breakfast option that is high in protein as it is made with a blend of different dal or pulses.
As this dish is prepared from a natural fermentation process, it becomes a great option for the body which promotes good gut bacteria. Here we have mentioned the most simple and easy Dal Appe breakfast recipe. Try and enjoy!
Wash the rice, chana dal, moong dal, and urad dal thoroughly. Soak everything together for four to five hours minimum.<br>Grind the pulses with rice together and make a smooth paste out of it.<br>Let the batter rest for 5-6 hours to ferment properly. Give it a good mix.
Adding Tadka to Batter
In a pan heat some oil, add mustard seeds, and curry leaves. Add the tadka mix to the batter.<br>Then add coriander leaves, then take garlic cloves, green chilies, ginger, and roasted cumin seeds. Give the ingredients a good smash together and add them to the batter.<br>Then add the remaining ajwain, salt as per taste, and fruit salt, to the batter and give it a mix.
Preparing Dal Appe
Take an "Appe patra" a utensil in which Appes are made. Heat it, add oil to the base, and put the batter on the tray.<br>Keep the flame medium and cook it for five minutes. Then after 5 minutes, flip the apple and again cook for 5 more minutes keeping the flame medium.<br>The tasty appe is ready, enjoy it with sauce or chutney.
NOTES
Keep the flame medium, neither low nor high.
The batter can be customised by adding fried onions, peanut paste to make it nutrition dense and tastier.
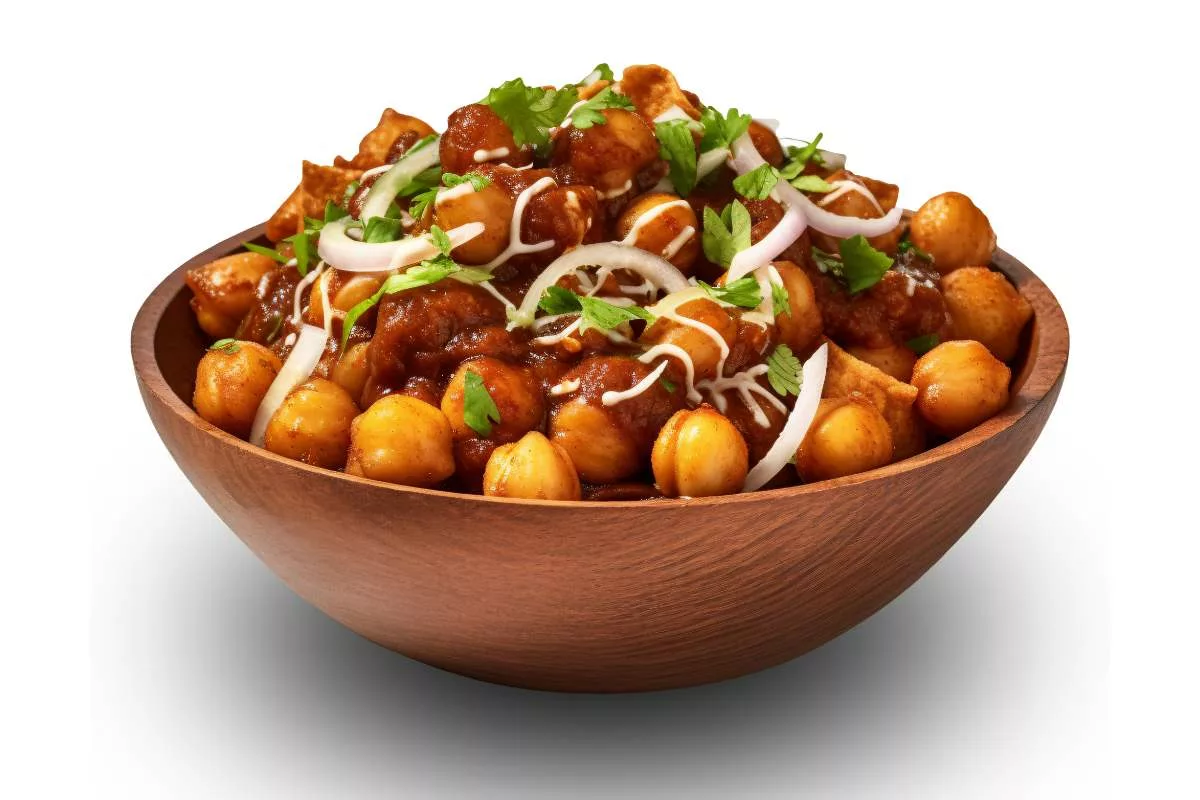
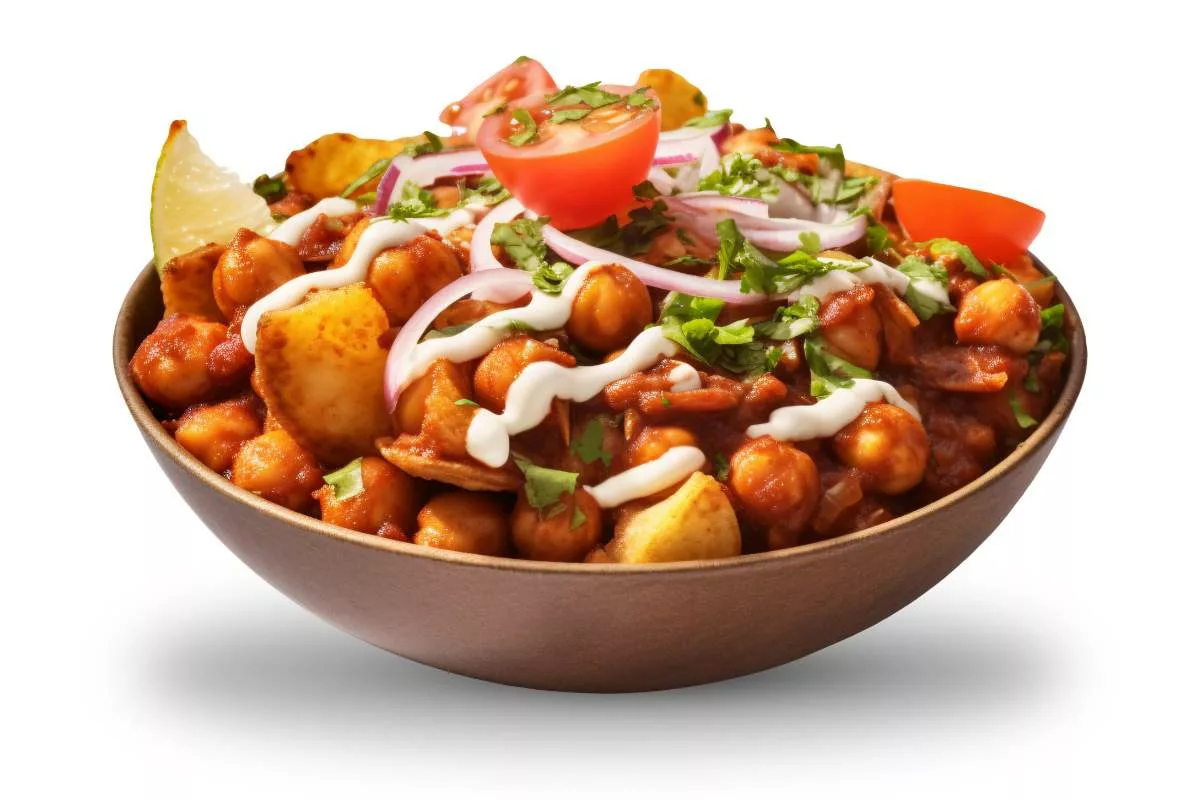
Aloo Chana chat is a street food that has originated from India, especially in the West Bengal and Northern Indian states. It is prepared by boiling Potatoes and mixing the same with other ingredients to make it more fulfilling and healthy. Adding oil, spices, and chutney to this recipe makes its taste beyond words! Do try this healthy Aloo Chana Chaat recipe which is high in protein and can be consumed as morning breakfast or evening snack.
Recipe By Vahchef
Course: Street Food, Snacks Cusine:Indian Difficulty:Easy
Servings
2 minutes
Preparing Time
Advertisement
20 minutes
Cooking Time
5 minutes
Advertisement
Calories
350 kcal
INGREDIENTS
1 Bunch chopped Coriander
2 chopped Green chilies
1/2 Bunch chopped Mint
1 tsp Chat Masala
1 tbsp Red chilly powder
1/2 Cup Chickpeas (chana dal)
2 boiled potatoes
1 tsp lime juice
Salt To Taste
1 Chopped Onion
3 tbsp Pomegranate seeds
1 tsp Cumin powder
2 tbsp Sweet tamarind chutney
DIRECTION
Preparation for the chat
Take the boiled potatoes and cut them into cubical pieces. Dry roast some cumin seeds, crush them, and keep them aside.
Preparing the Chaat
Take a big bowl and add cut potatoes, and boiled chicken peas, and mix them with the help of a spoon.<br>Then add chopped mint, coriander, green chili, and Onions and mix them.<br>Then add, chat masala powder, red chilly powder, lime juice, and salt to taste and mix everything.<br>To the bowl, add sweet tamarind chutney, freshly roasted crushed cumin seeds, and pomegranate seeds, and mix all the ingredients. The most delicious Aloo Chana Chaat is ready!
NOTES
Chaat can be customised by adding chopped Tomatoes, roasted peanuts and sprout, to make it more healthy.
Advertisement
Add salt with caution as chaat masala also contains salt.
Sweet tamarind chutney is optional, but it gives an enhanced taste to the chaat.


:format(webp):no_upscale()/cdn.vox-cdn.com/uploads/chorus_asset/file/20005024/Fridge_Organization_List.png)